Did you know that the MetaMask is the most popular crypto wallet in the world?
In this article, you’ll get a deep look at what it is and get a detailed guide on how to set it up.
So let’s get started!
Now, You’re probably wondering, “What is Metamask?”
Metamask is an Ethereum-based wallet that was launched in 2016 by a guy called Aaron Davis.
Ethereum-based means that Metamask only accepts coins or tokens based on the Ethereum network.
Now, you can still use the wallet for Bitcoin and a few other non-Ethereum coins, but the process is outside the scope of this article - feel free to check back for updates though!
Metamask is also classed as a non-custodial wallet, which means it doesn’t depend on any third parties or central organizations to work.
The wallet owner is the only person who can control what comes in and out of that wallet.
This is all well and good but, how does this article help you out?
Firstly, you’ll see how to download and install the Metamask wallet on your browser.
Then, how to set up your personal Metamask account.
Next, I’ll show you how to both load and send crypto in your wallet.
Finally, you’ll learn some basic security tips you need to know about the wallet.
So, Let’s Get Your Metamask Account Up and Running!
Step 1 - Downloading Metamask Wallet
For this demonstration, I’m going to show you how to download and install Metamask as a Chrome browser plugin.
First, head over to the Web Store and search for “Metamask.”
You should be able to see the extension with millions of downloads, as shown in this screenshot:
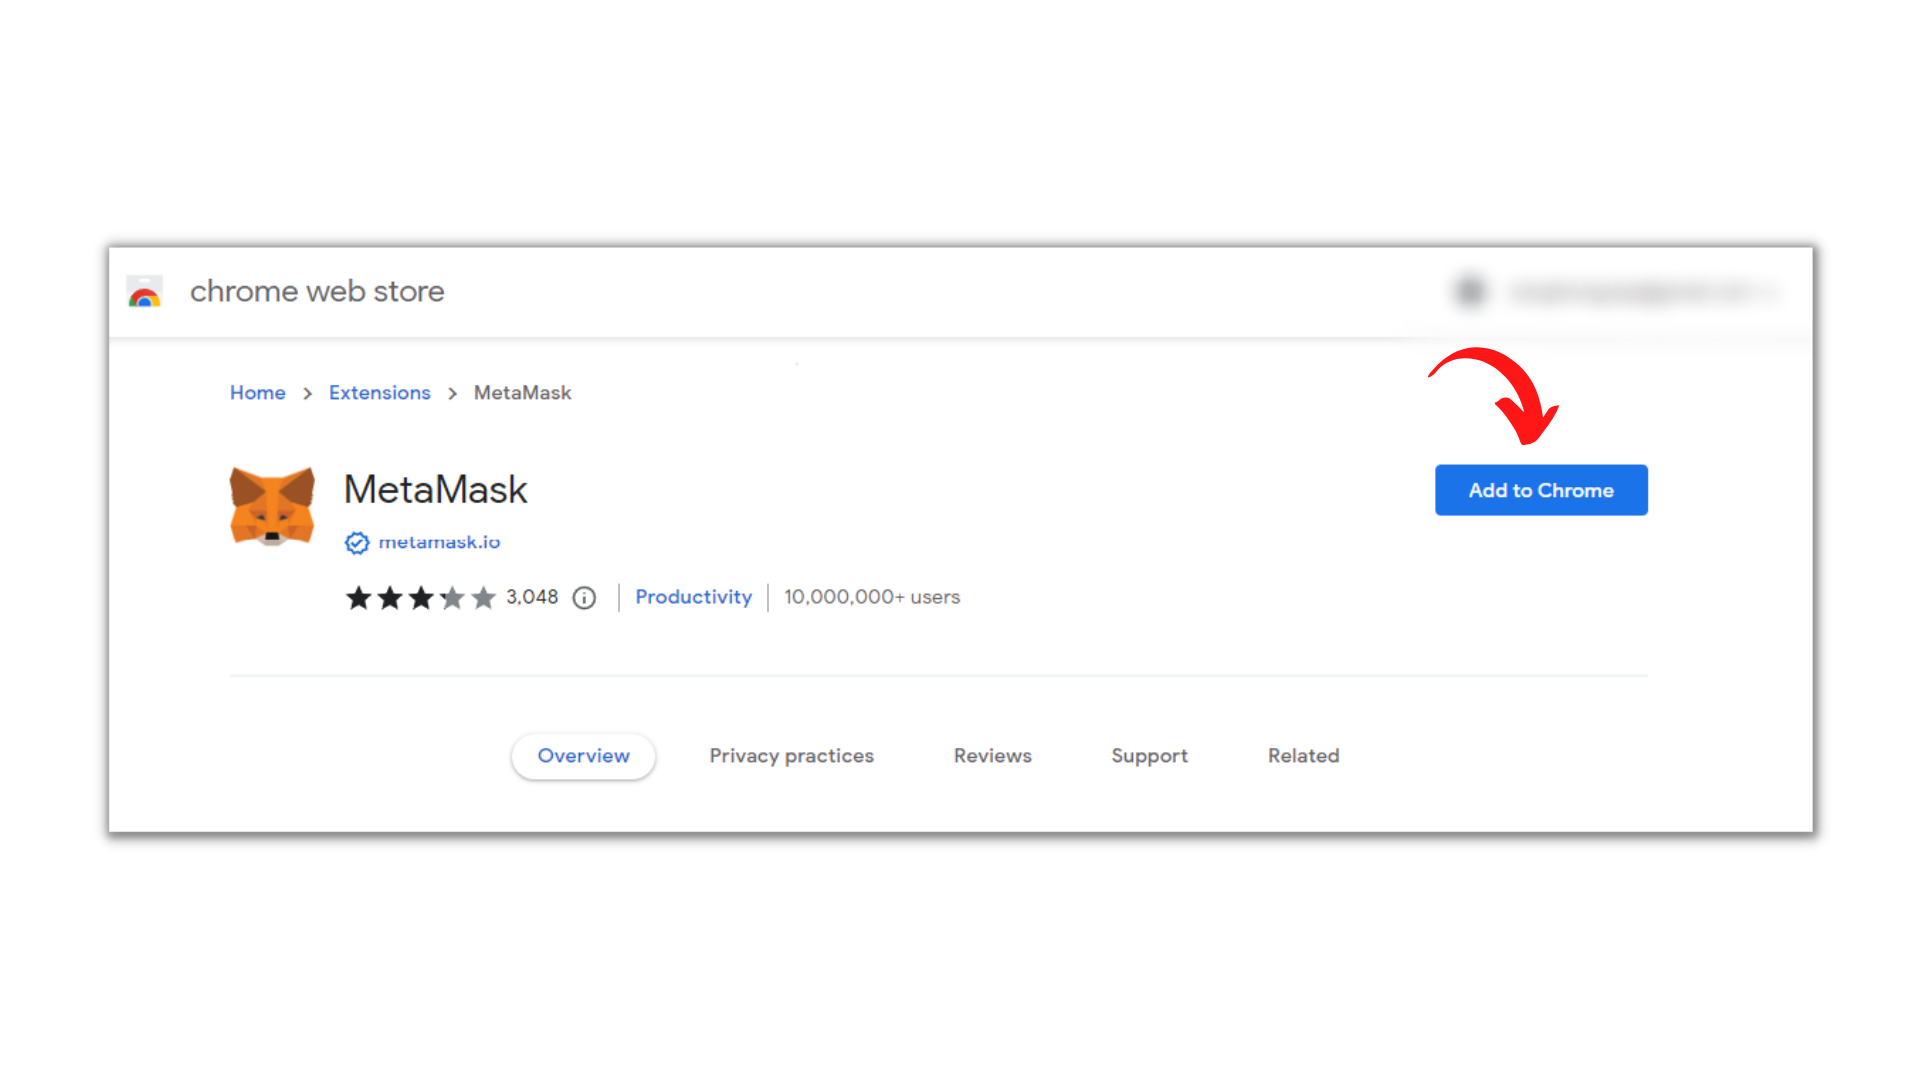
Hit the blue “Add to Chrome” button on the right side of your screen.
Give it a few seconds to finish installing.
Once everything is installed, it’s time to set up your account.
Step 2 - Setting Up your Metamask Wallet
Once the Chrome extension is fully installed, you will be redirected to a page that looks like this:
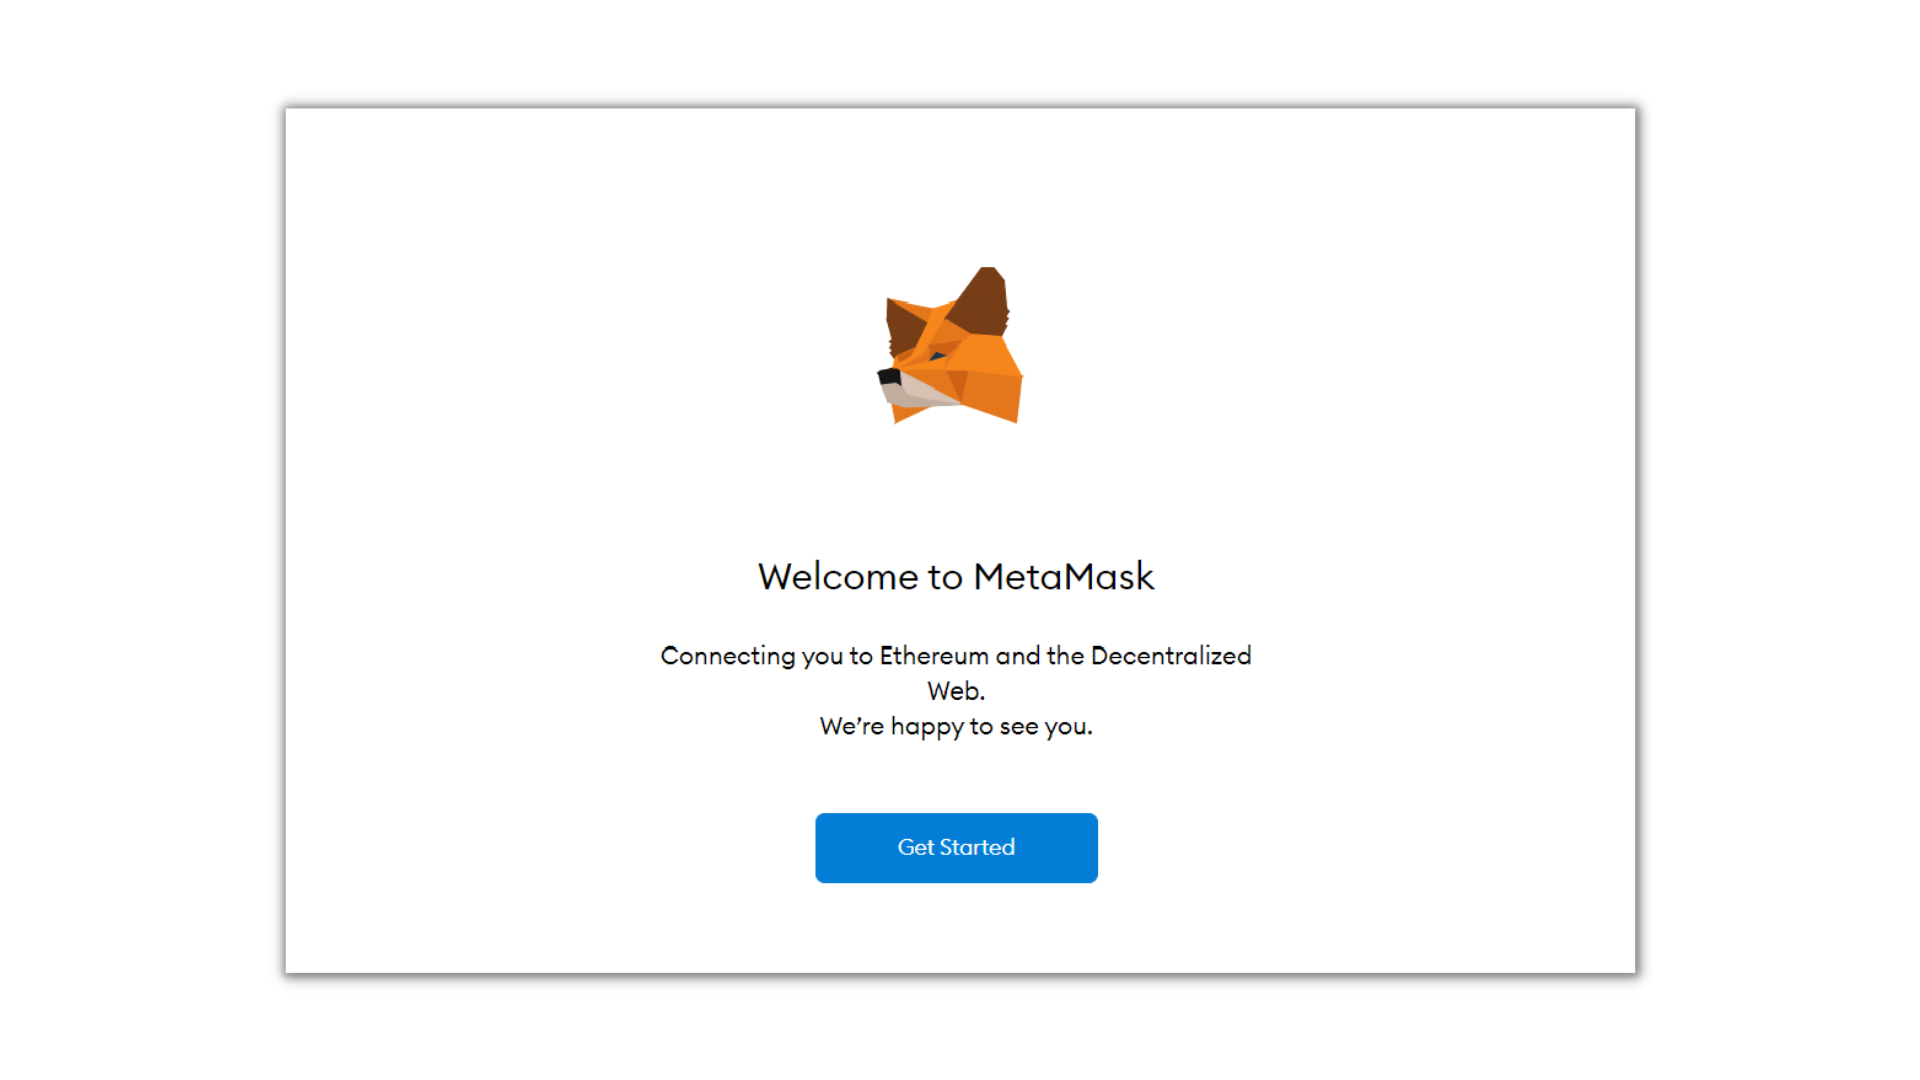
The only thing you have to do to start the setup process is to click on the “Get Started Button.”
Here, you will get two options, as captured in this image:
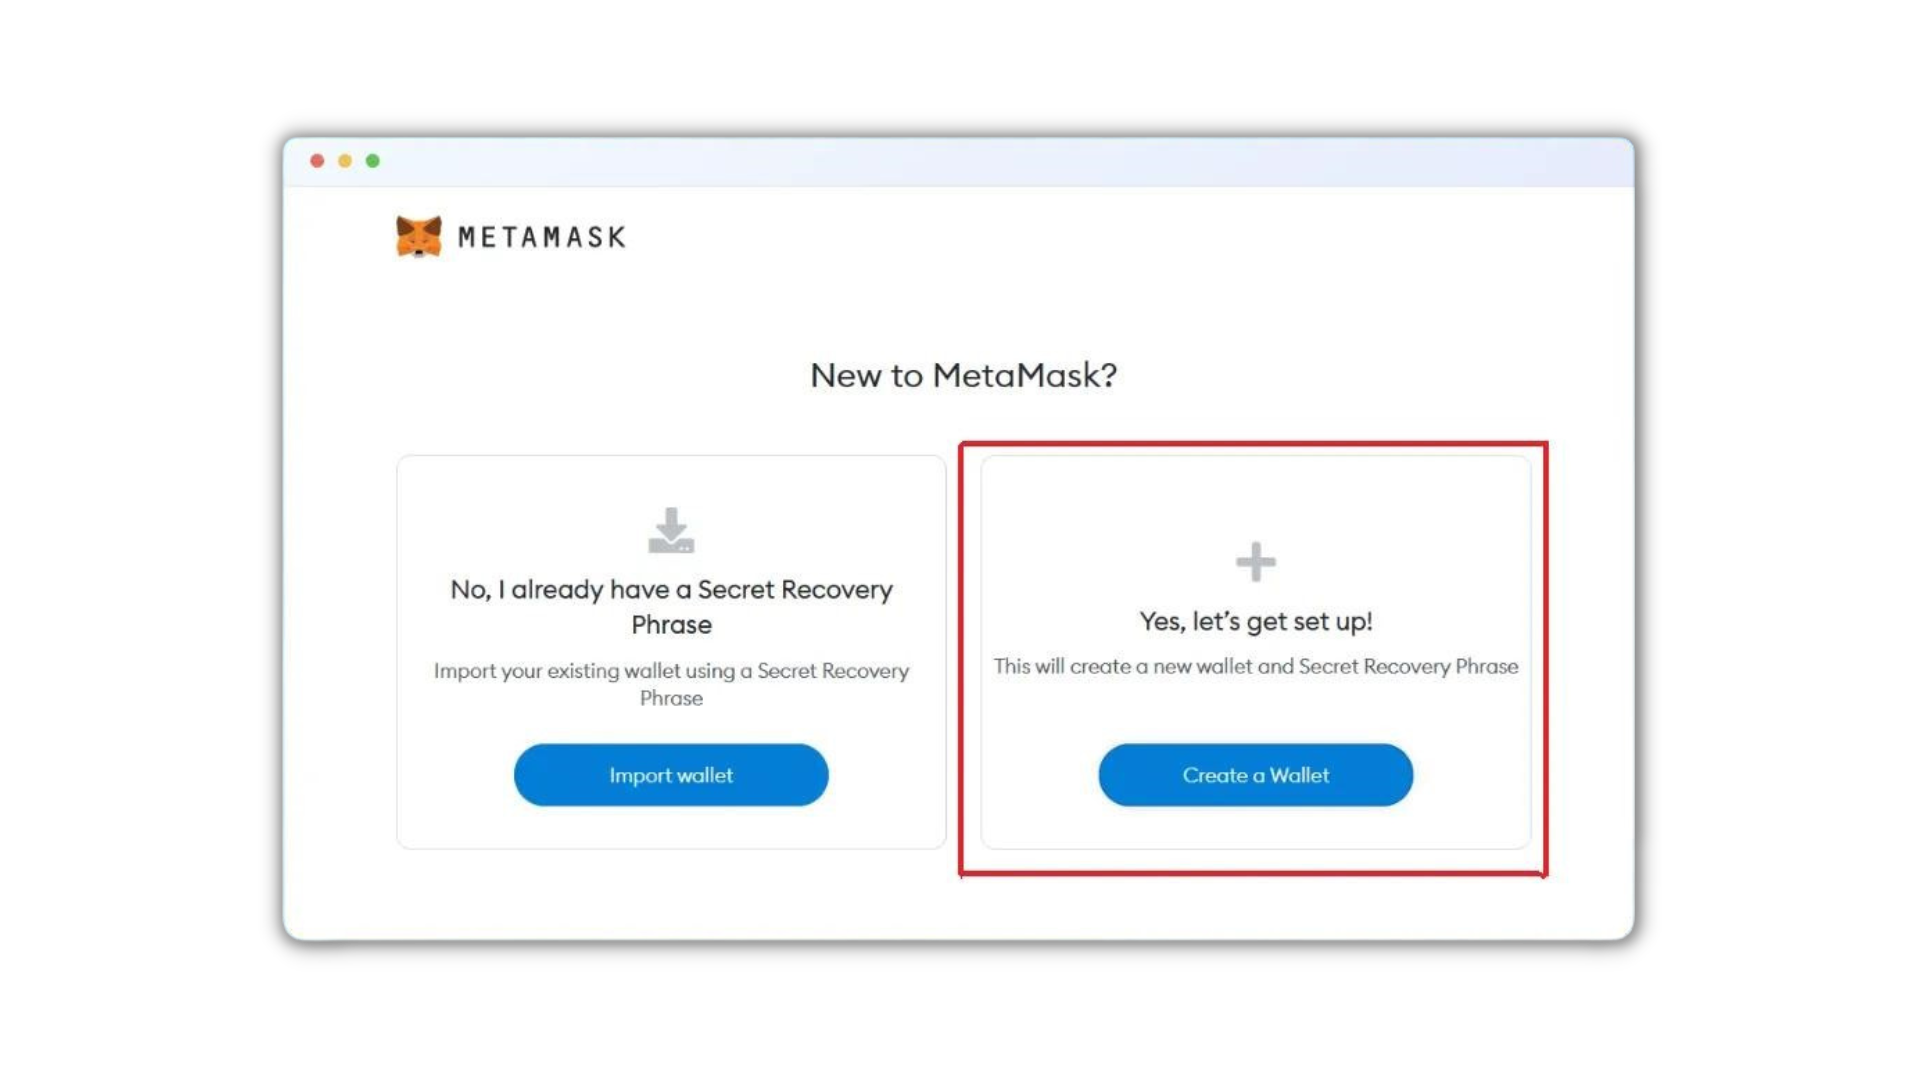
Since I’m guessing this is the first time you’re creating and setting up a Metamask wallet, click on “Create Wallet.”
You’ll need to accept some terms and conditions but as soon as these prompts are completed, the next critical phase is generating your wallet password.
This will typically be an 8-character password that you will use to access your Metamask account:
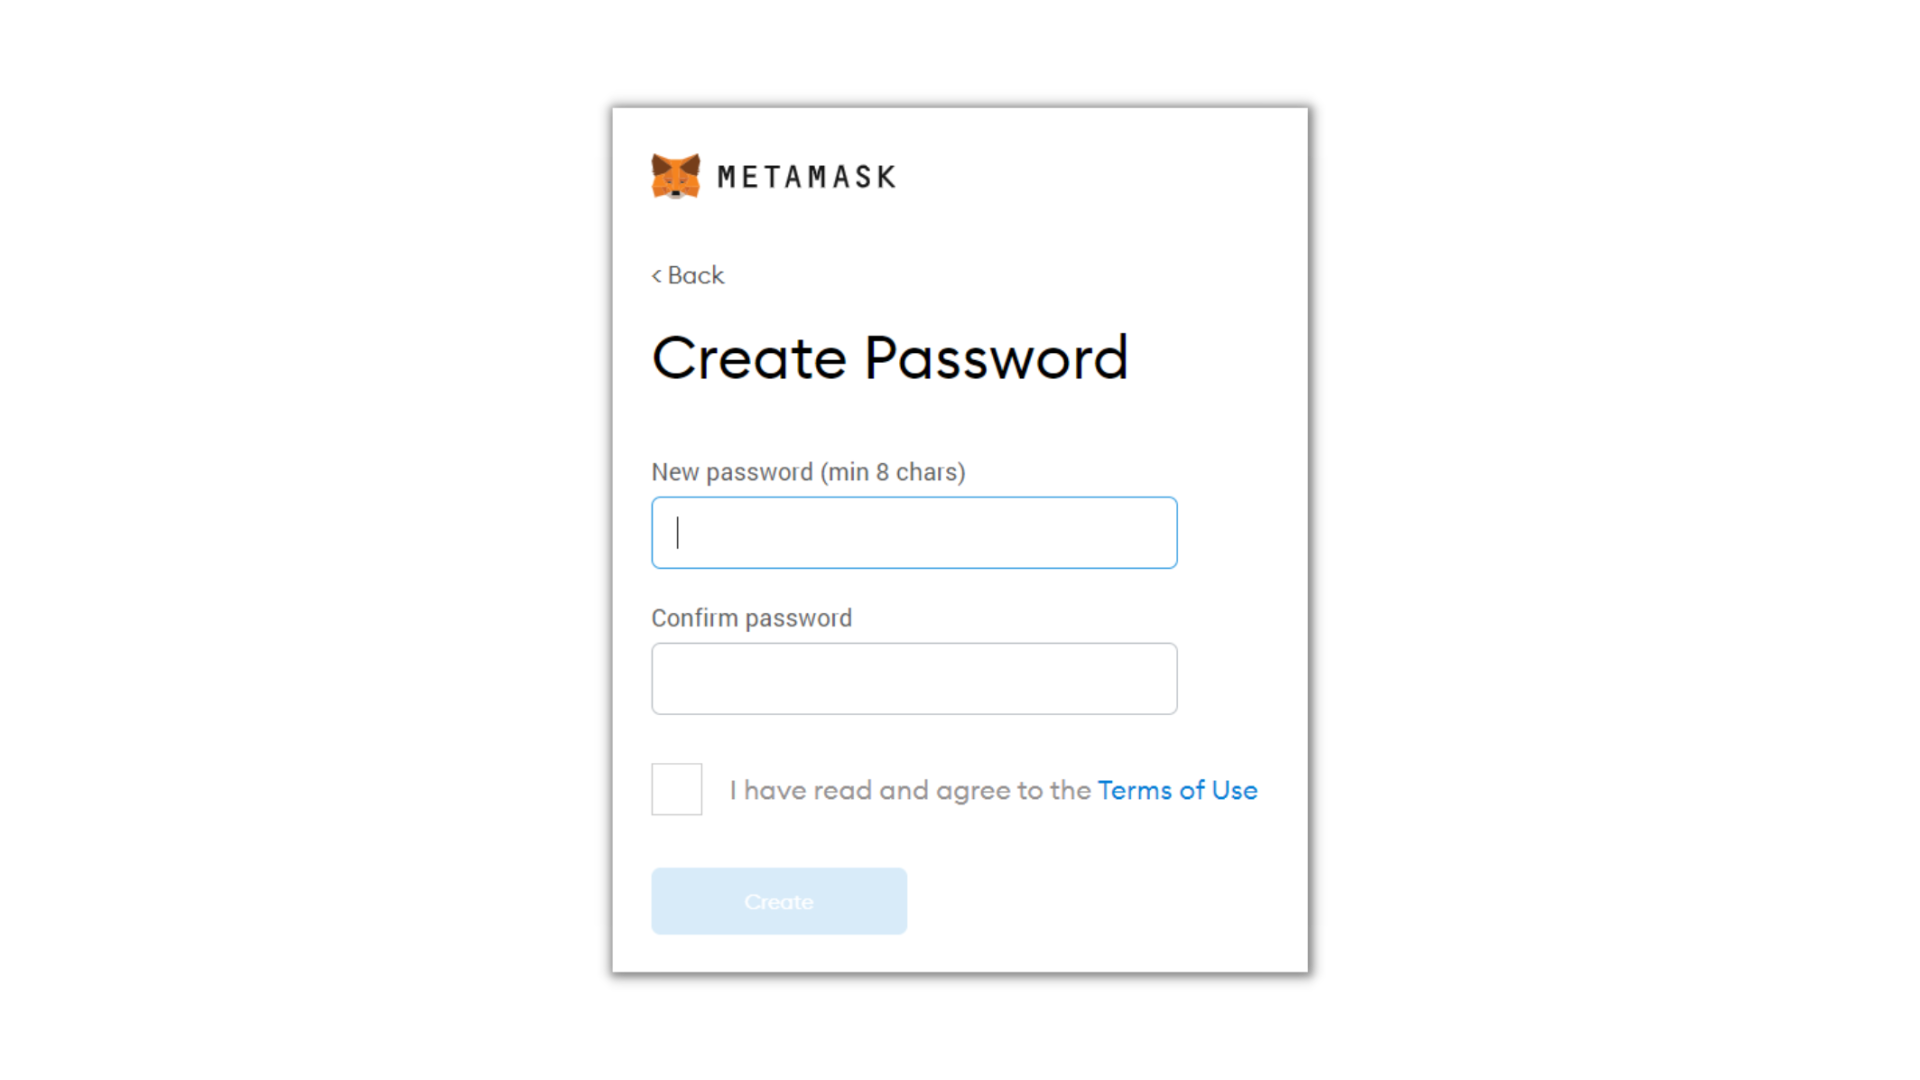
Once you set up the password and hit next, you will be redirected to a page where you can set up something called a seed phrase.
The seed phrase is a special kind of backup phrase which you can use to back up and restore your account in the future.
It is crucial that you understand the importance of recording your seed phrase somewhere safe, as it can be used to recreate your account from anywhere, by anyone.
You do not have to generate the seed phrase right away though, you can always hit “Remind Me Later.”
Once the seed phrase is generated, you will be required to confirm it before moving to the next step, as shown here:
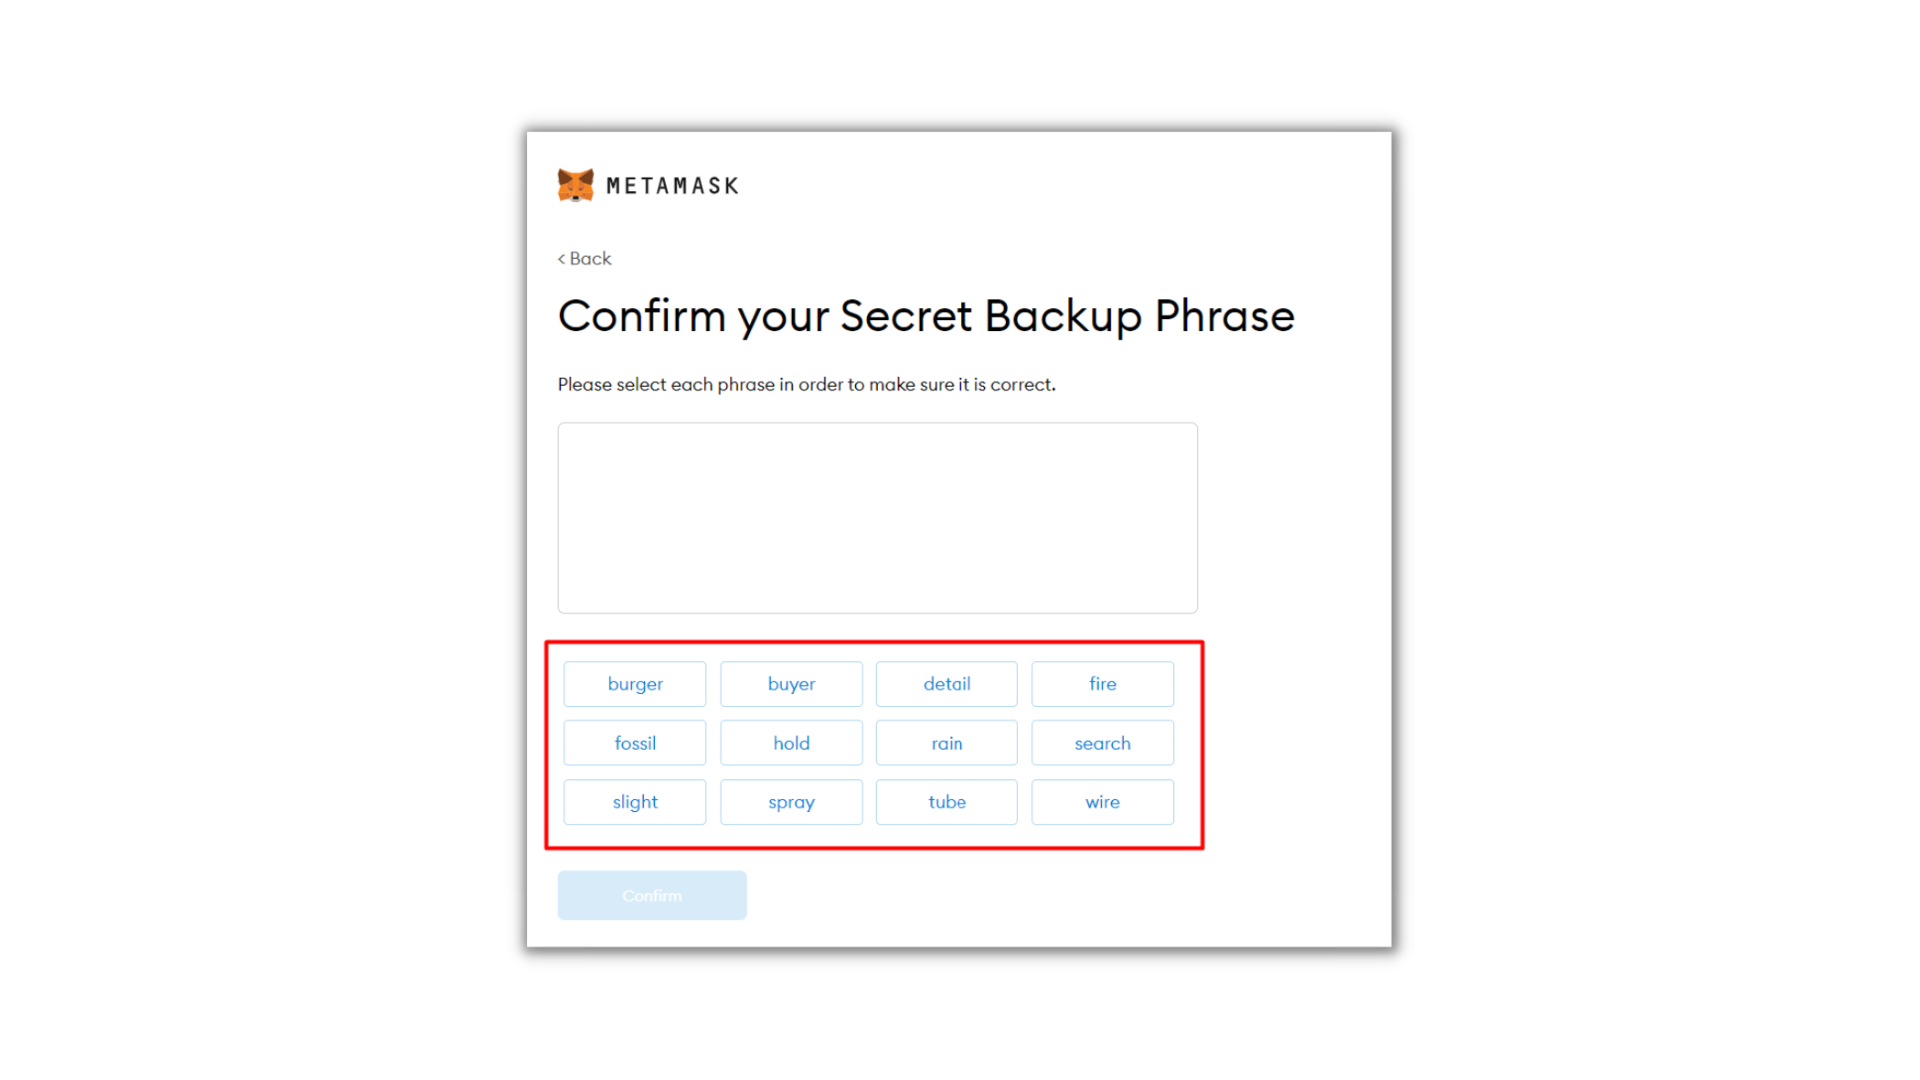
For this step, simply arrange your phrase in the right order, and you should be done.
The phrase will then be confirmed, and your Metamask wallet will now be ready to use!
So, now we’ve got everything set up - it’s time to start using it!
Step 3 - Buying Crypto Using your Metamask wallet.
Assuming this is your first time setting up a wallet, the balance will be 0.
For this reason, let me start by showing you how to load crypto into it.
The good news is that you can actually buy crypto directly from your MetaMask Wallet.
First, head to “Account Balance.” You should see something like this:
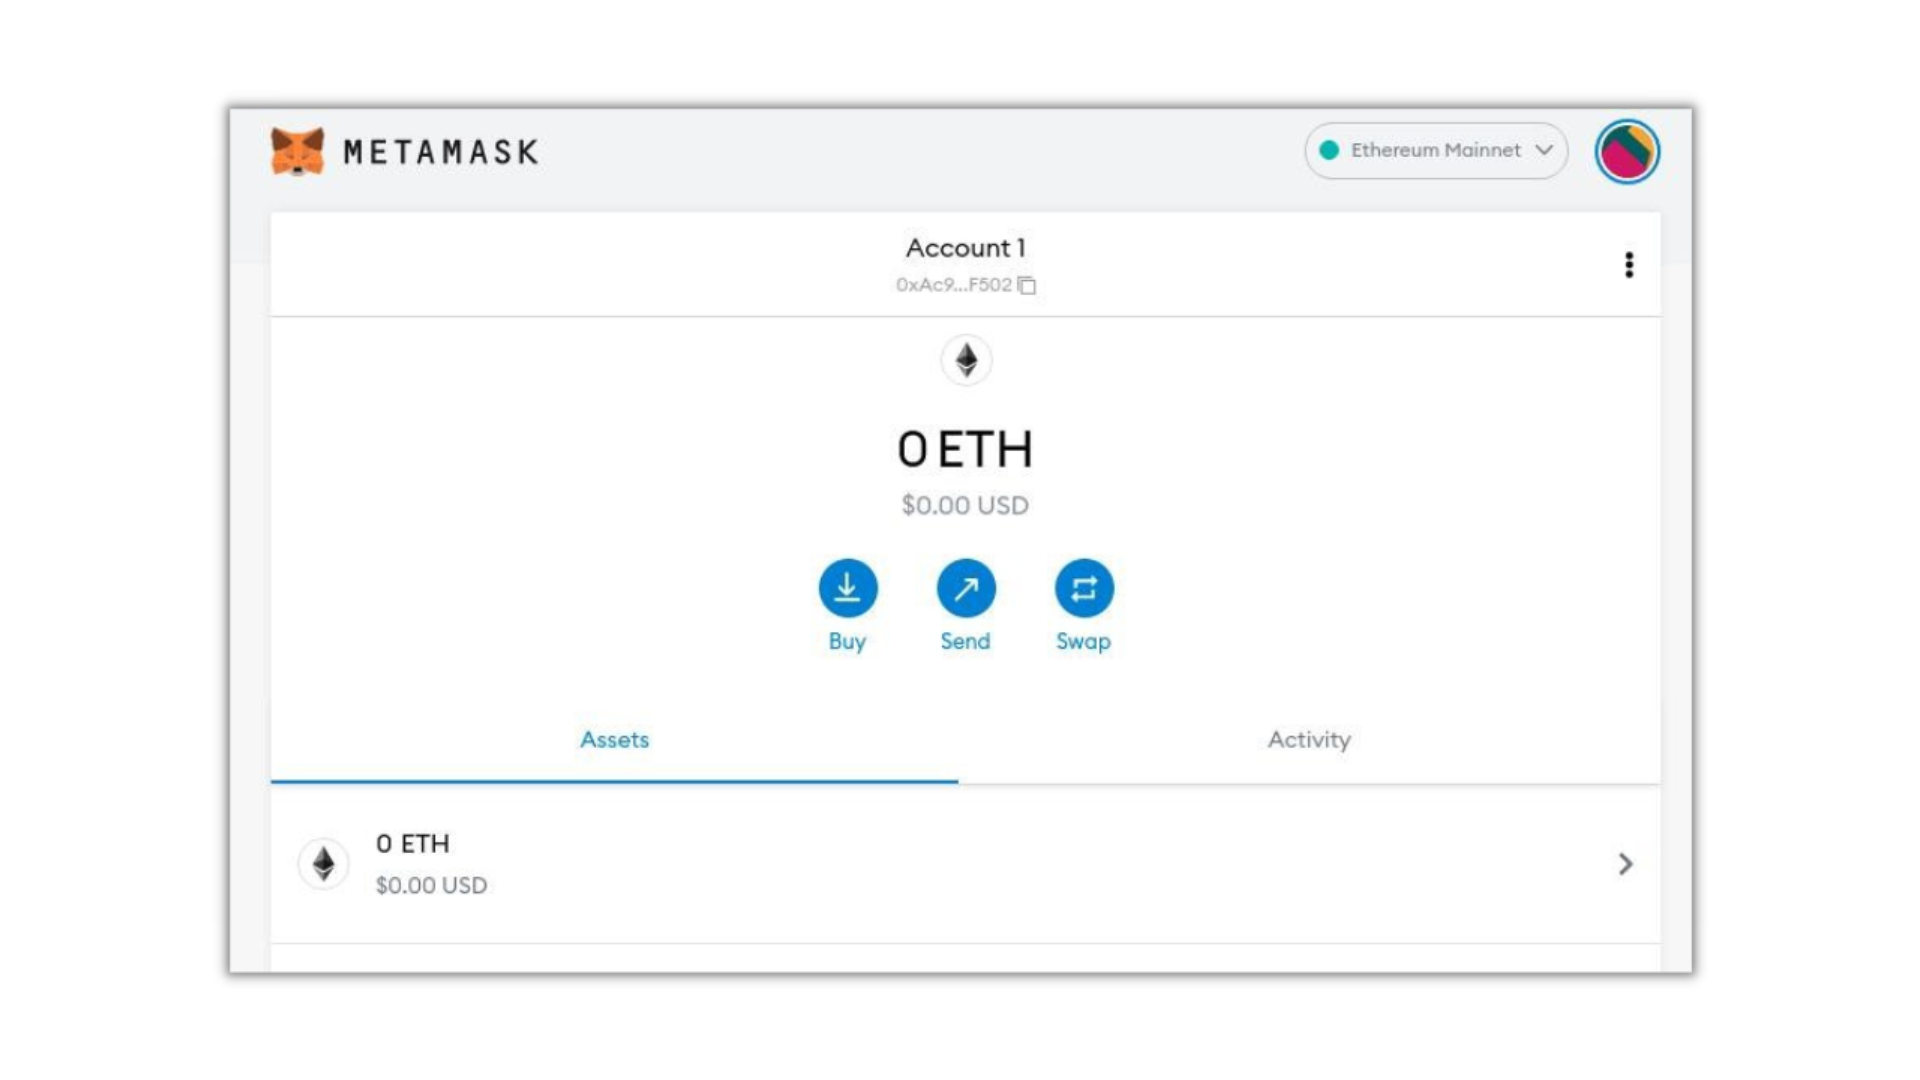
Hit the first “Buy” button on the left.
You will now be redirected to a new page where you will choose the type of crypto you want to buy and the amount of money you intend to spend, as shown here:
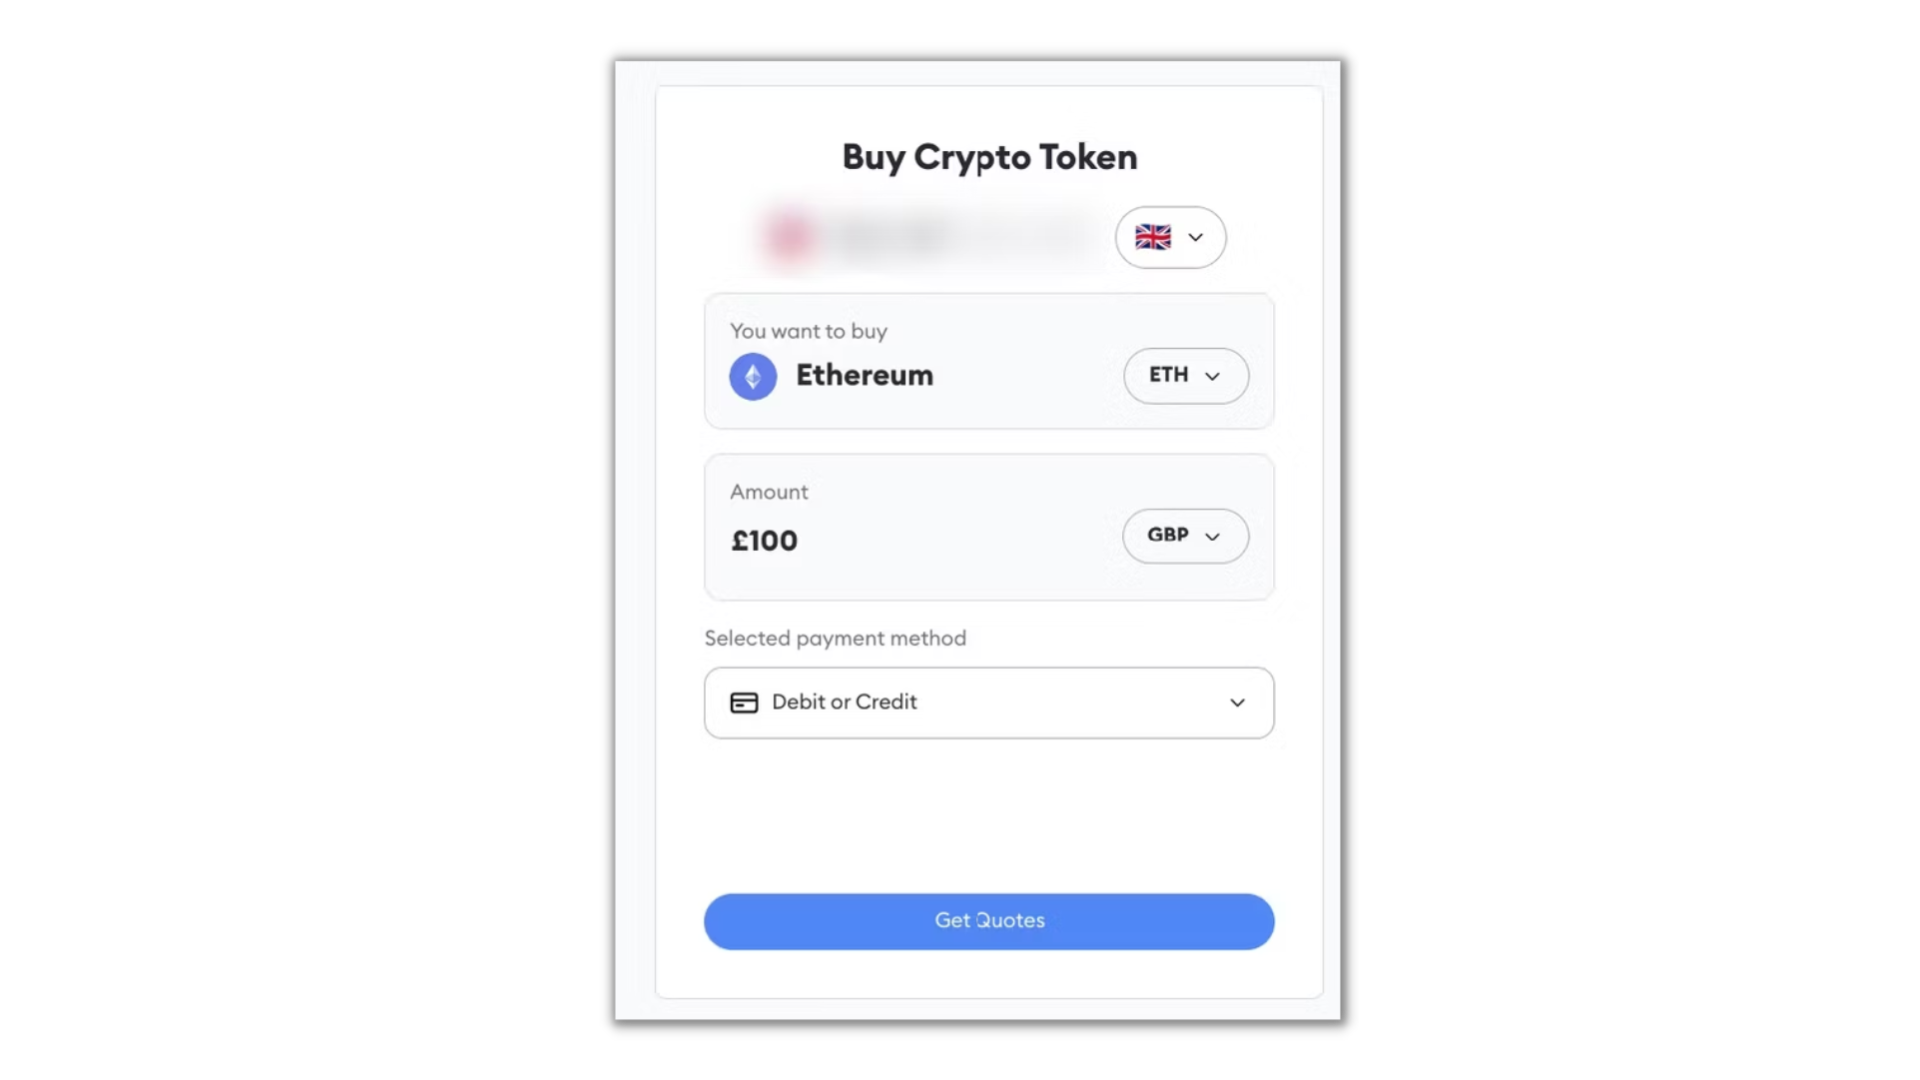
Importantly, you will also be offered some payment methods. These will vary depending on the country you are in, but for the sake of simplicity, I will assume a Debit or Credit card.
Go ahead and select the crypto you want to buy, how much you want to spend, and the fiat currency you intend to use.
Following this, the Metamask wallet will provide you with several quotes.
These quotes are sourced from various exchanges. Simply find an ideal quote and select it:
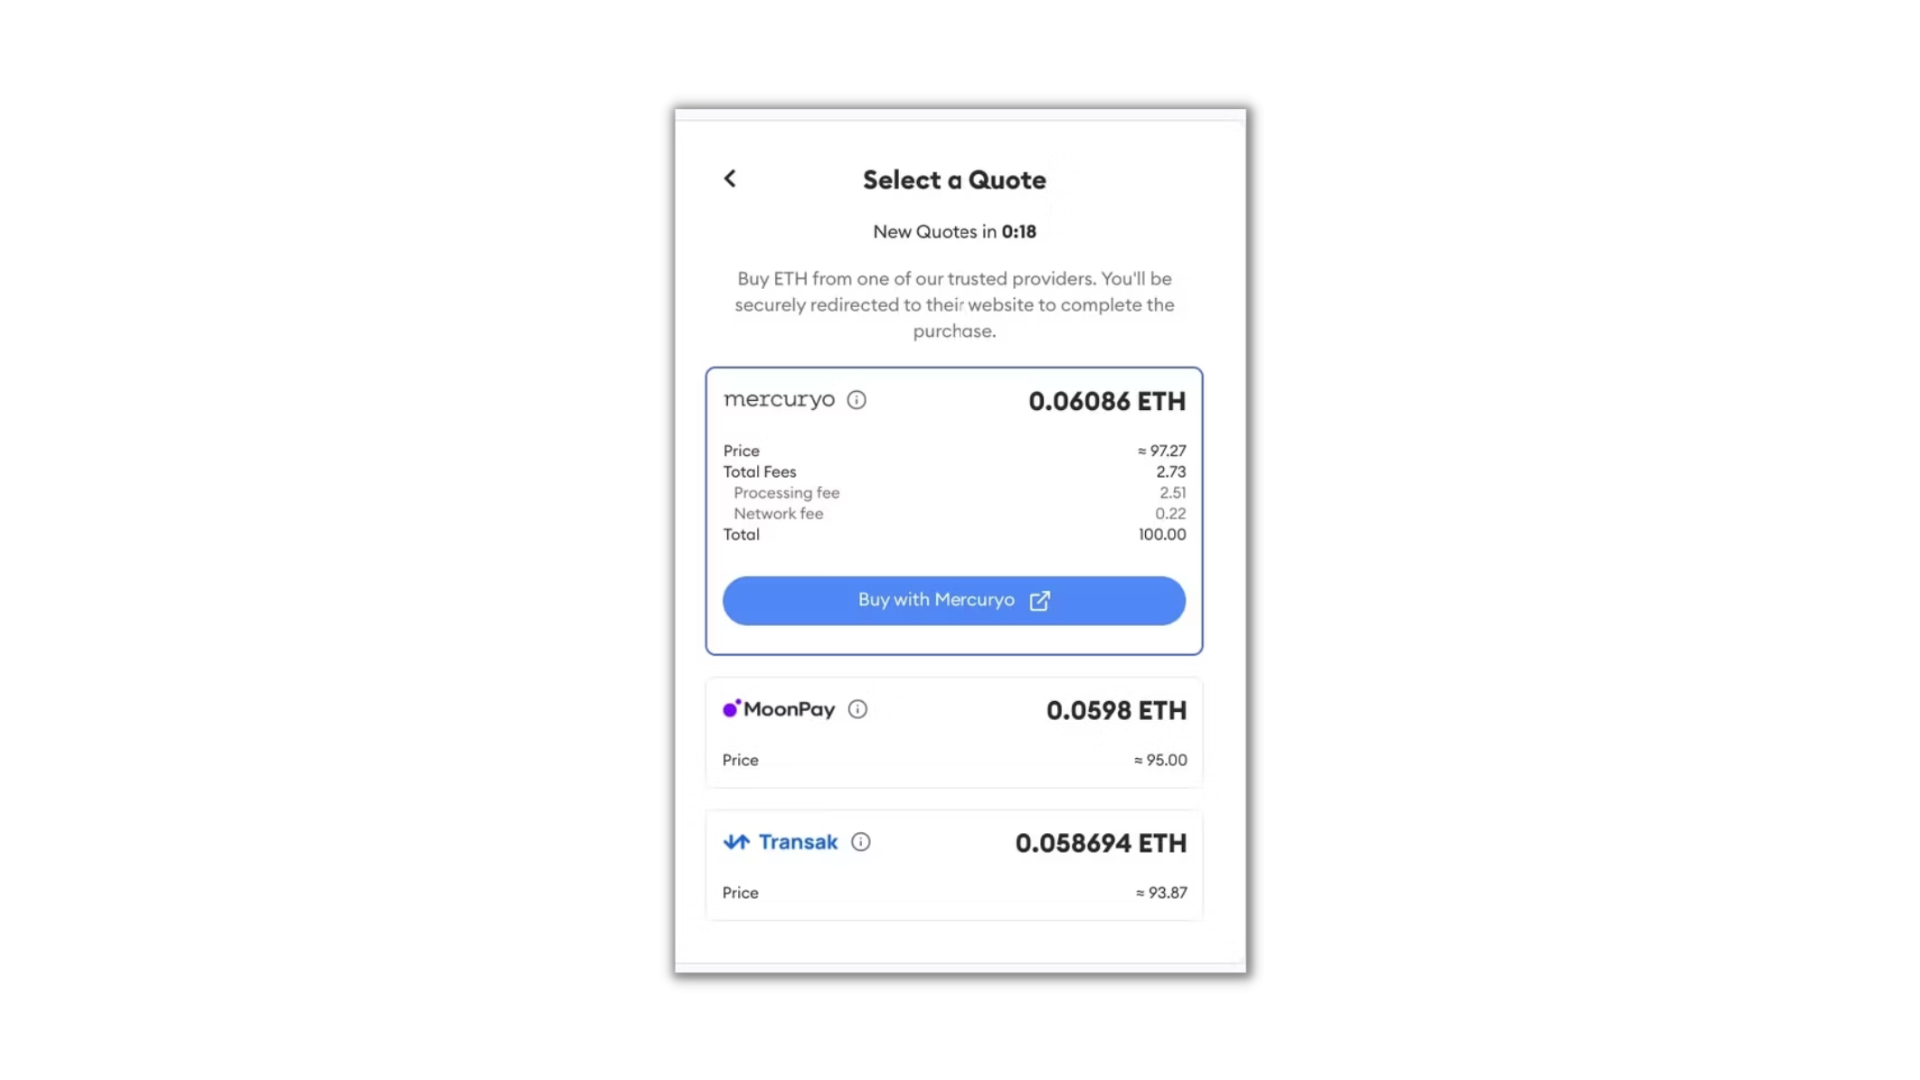
The wallet will then redirect you to the payments page, where you will confirm your payment method and complete the transaction.
Great! Now you’ve got some crypto in your Metamask wallet, how about sending it to someone?
Step 4 - Transferring Crypto to Other Users
Before you transfer crypto from your Metamask wallet, two essential points need to be covered.
Firstly, there must be enough balance in your account to complete the transaction, including paying all the fees required.
Secondly, you will need the public wallet address of the person you are sending this crypto.
If you have both of these things, then let’s get going.
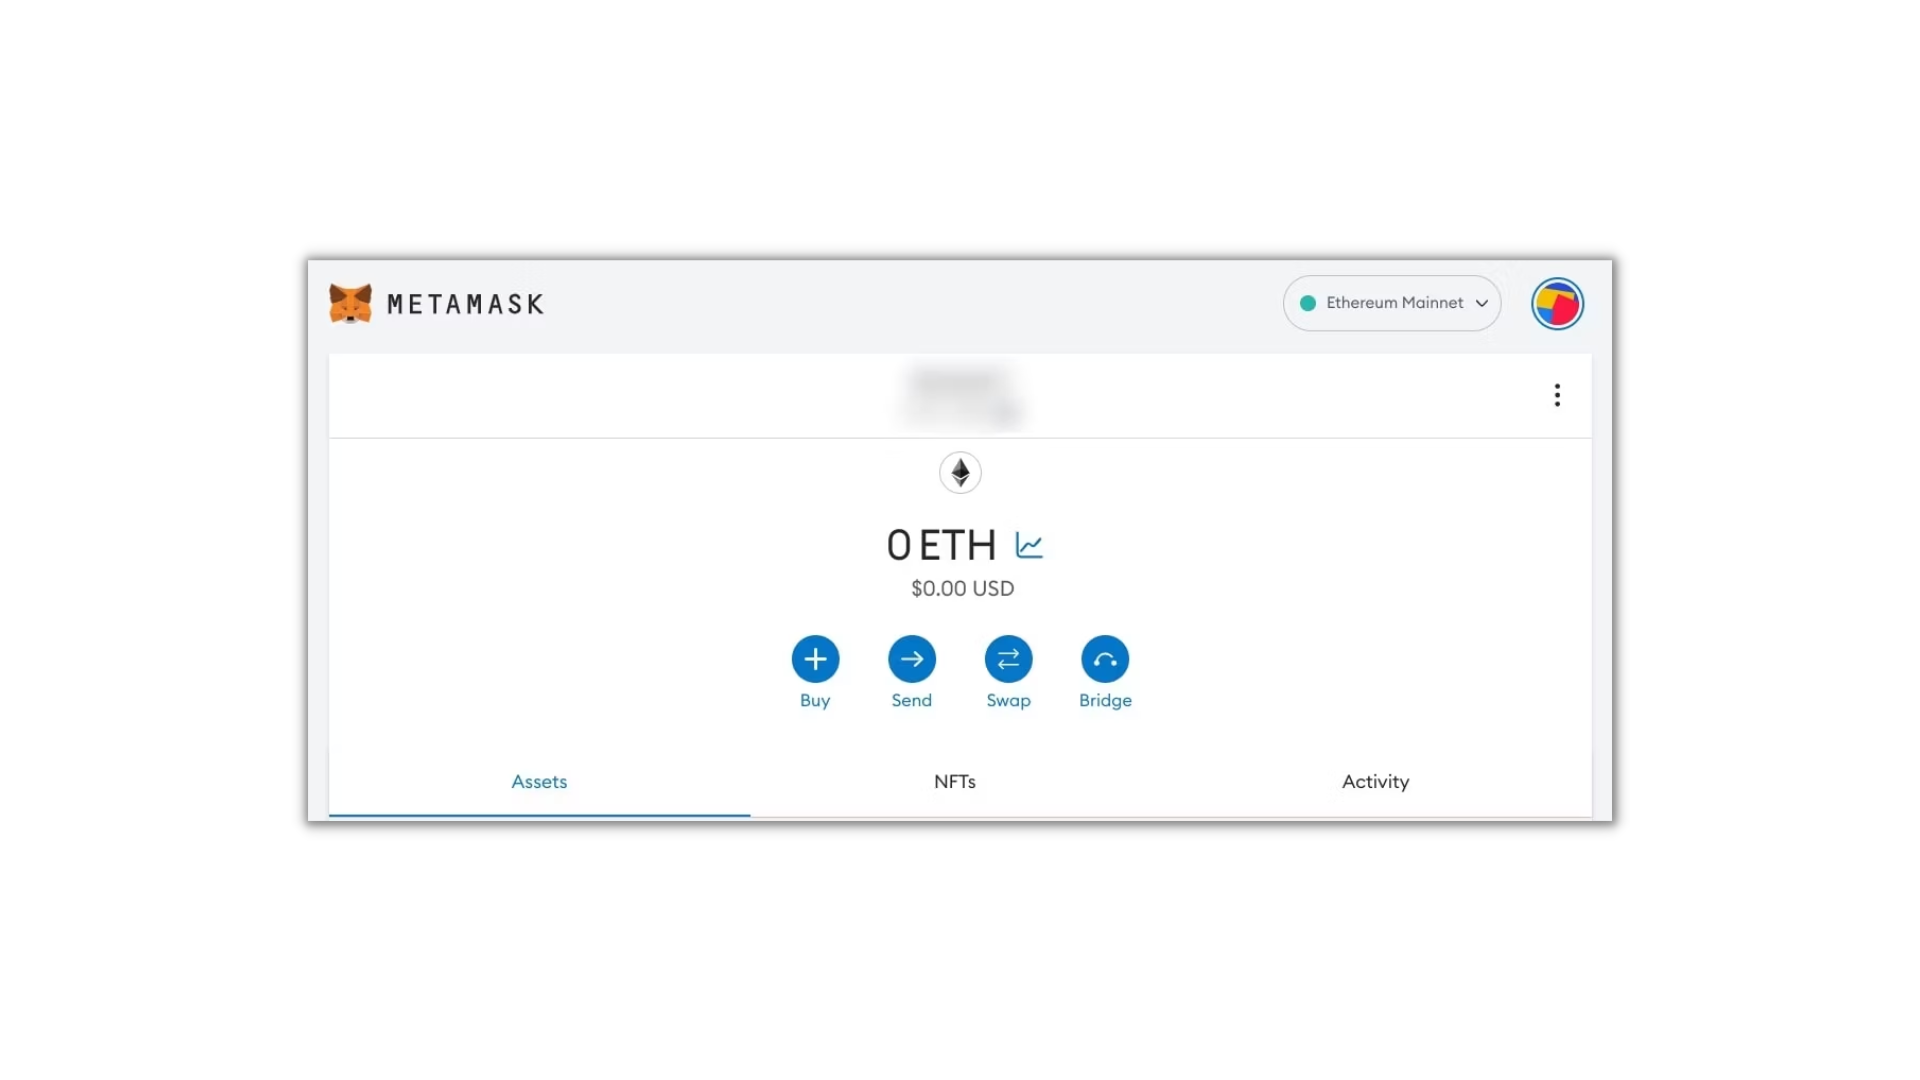
Head over to “Account Balance” on your Metamask wallet.
You will see the “Send” button just next to the “Buy” as shown here:
Once you hit send, copy/paste in the public wallet address of the person you intend to send the crypto to.
Make sure you enter their wallet address correctly - as mistakes could lead to lost funds:
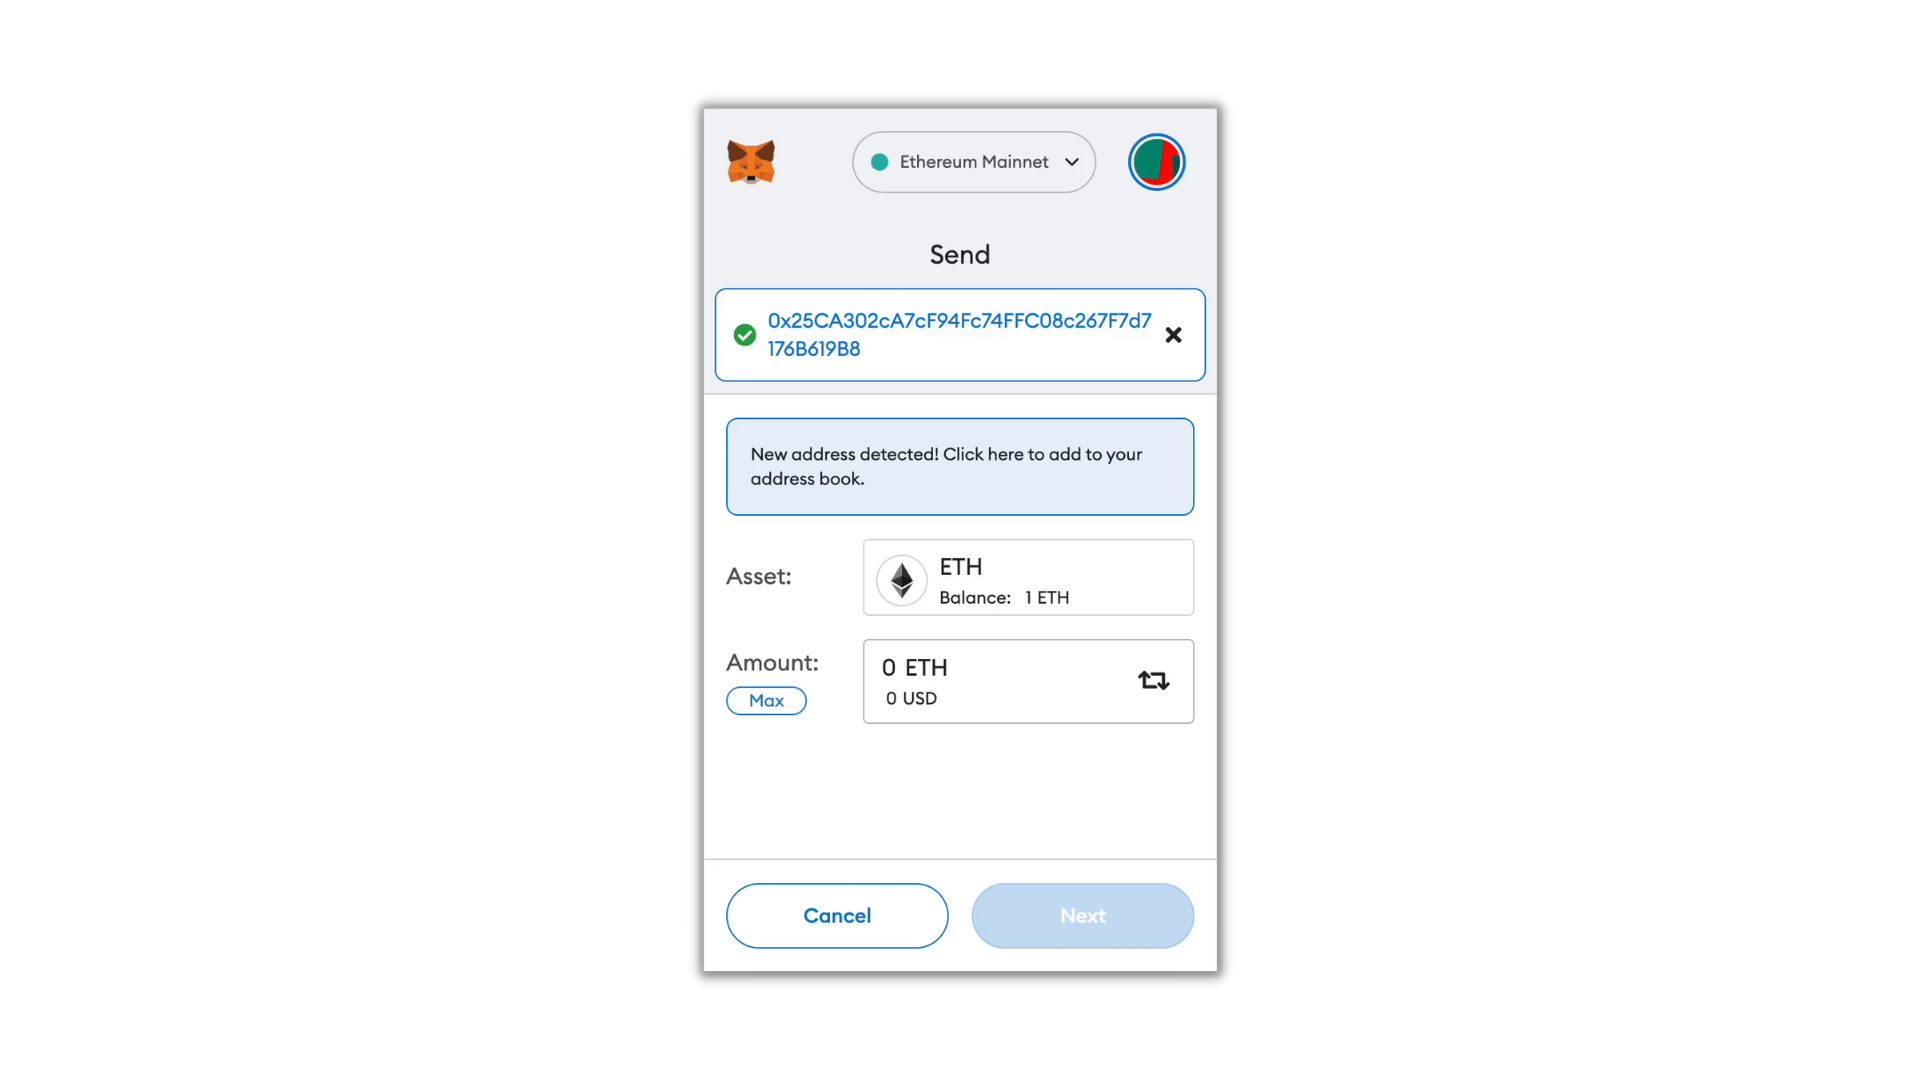
Luckily, the MetaMask wallet actually allows you to save different wallet addresses.
So, if it's someone you are likely to send crypto to again, you can just save their details for future use.
Once the address is entered and ready, it's time to specify the amount of crypto you want to send.
Once you have confirmed the amount, click next.
You will now be given an estimate of the gas fees needed to complete the transaction at that given moment:
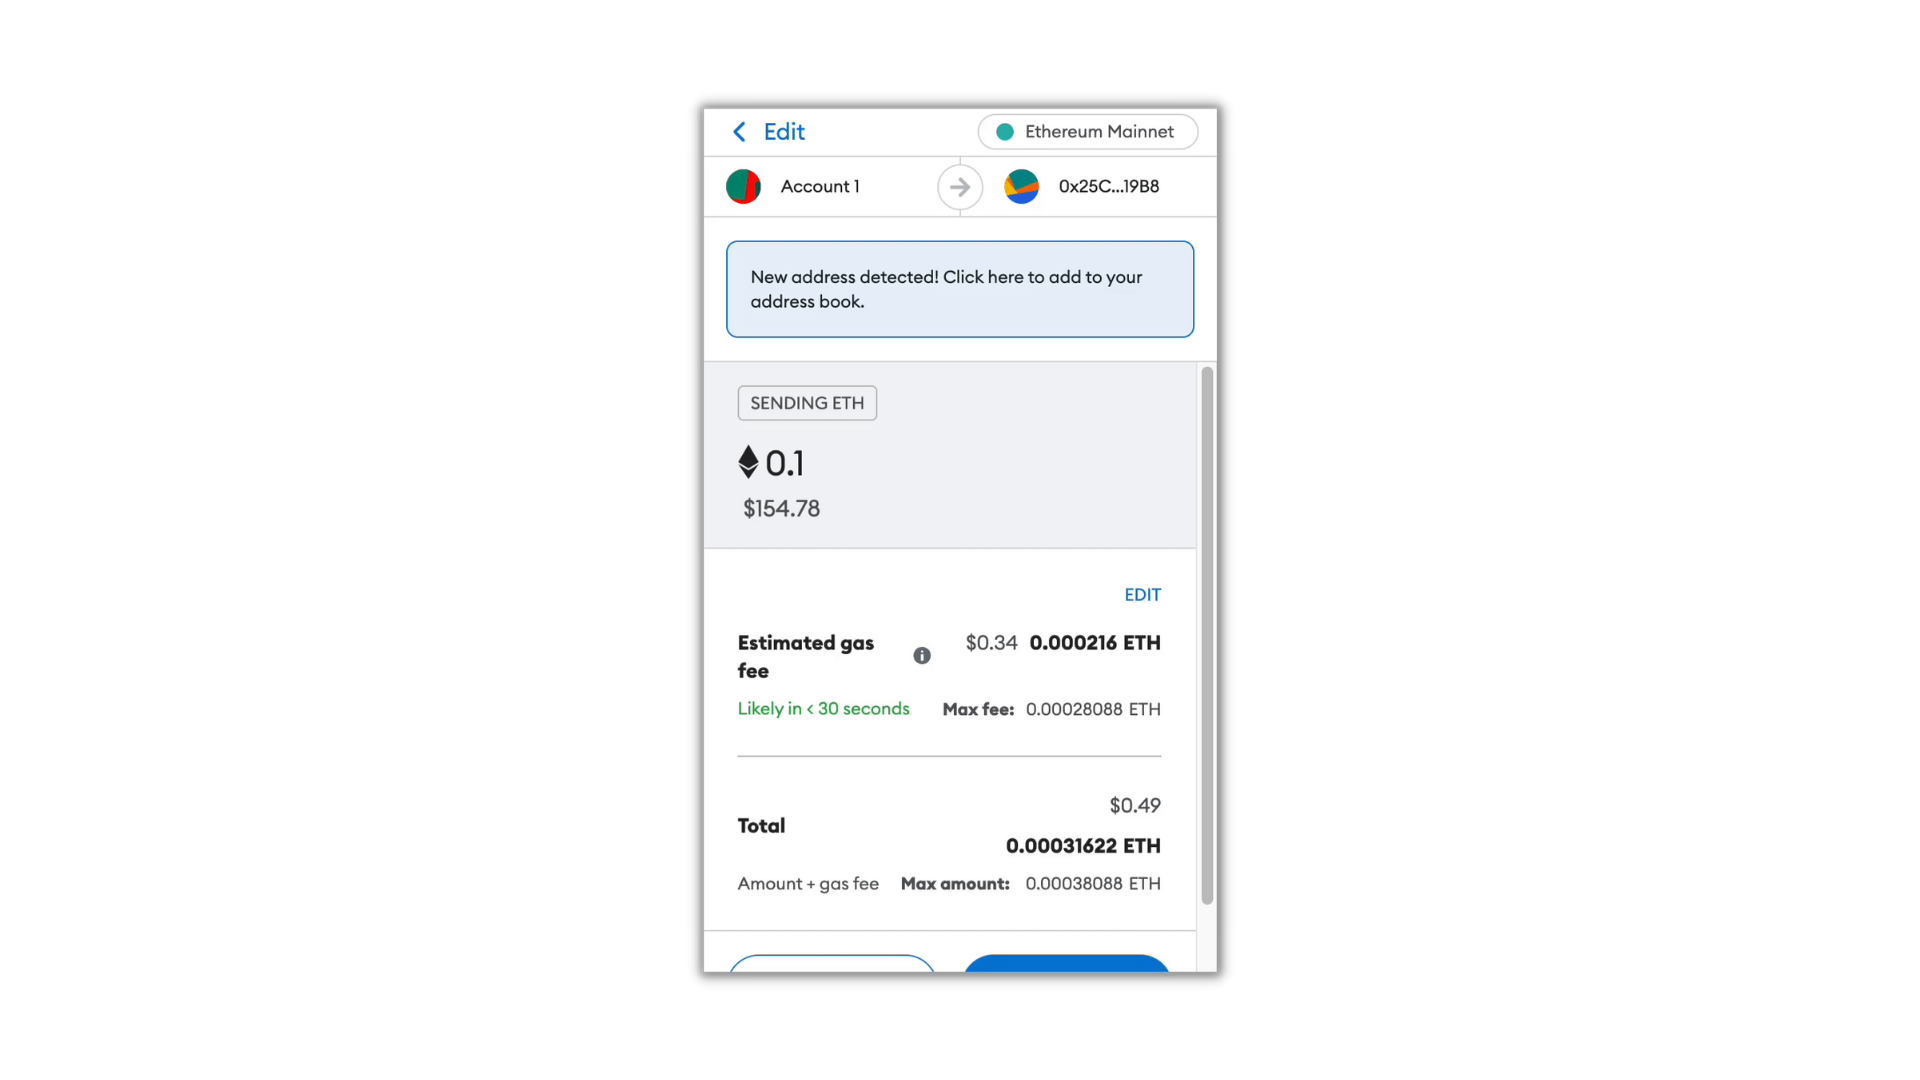
Gas fees are the name crypto networks use when referring to transaction fees. Basically, it’s the fee given to owners of computers who are providing the network.
If everything looks good, simply confirm the wallet address just one more time and then hit “Confirm.”
The transaction will commence and should typically go through in a few minutes or less.
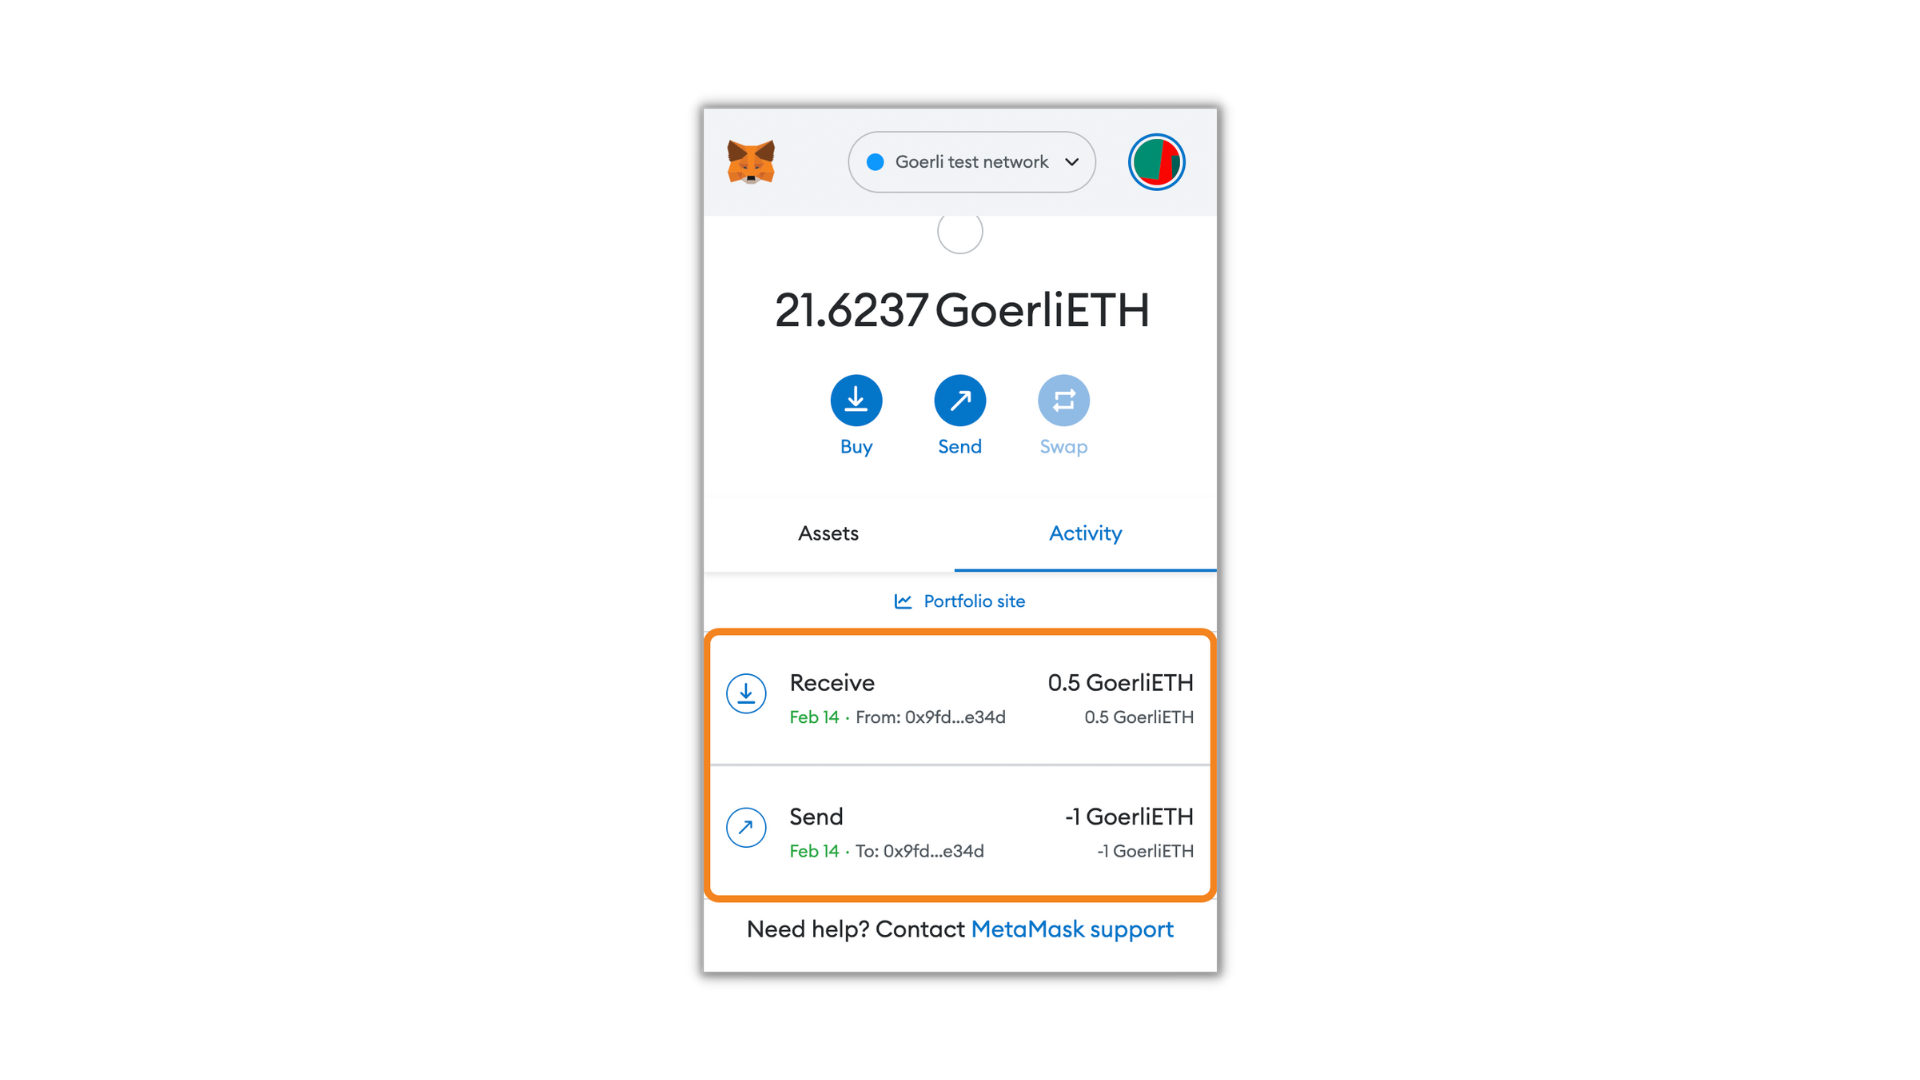
You can then go to “Transaction History” on your Metamask wallet to see all the transactions you have made:
So now you have your first non-custodial, fully decentralized wallet set up!
Congratulations!
However, it would be a shame if it were to be lost - so let’s get some security safeguards in place.
Step 5 - Securing your Metamask Wallet
The first, and perhaps the most important security tip is to never share your seed phrase with anyone.
As stated, your seed phrase can fully restore your wallet, granting full access to it.
If someone wants to send you crypto, they just need your public address only - if they ask for your seed phrase, they should never be trusted.
Metamask will never call or email you asking for the seed phrase or private keys.
Anyone asking you for this kind of information is a scammer.
Another tip is that if you intend to hold a significant amount of crypto for a longer time, it might be worth investing in a cold wallet.
These cold wallets are typically hardware-based, to be stored offline and away from the Internet.
While Metamask is quite secure, all digital software can be exploited in the future if weaknesses are found and access is available.
The only way to reduce that risk to zero is to store your crypto away from the internet in cold wallets.
Conclusion
Well there you have it!
You were walked through what Metamask is, how to set up and use your account, and even learned some vital security tips to keep your cryptocurrency secure.
Cryptocurrencies might seem overwhelming at first, but with tools like Metamask, it becomes a whole lot easier.
Remember, owning and managing a crypto wallet isn't just about buying and selling digital currencies; it's also about securing your assets.
Be vigilant, use strong, unique passwords, and never share your seed phrase with anyone.
With all this information, you’re well-equipped to start using the world's most popular crypto wallet.
Thanks for reading, and I’ll talk to you soon!

